• Skip to main content
  • Skip to primary sidebar
  • Skip to footer

SarasYummyRecipes logo

  • Home
  • Baked Delicious
    • Eggless / Egg free Baking
    • Baked Recipes
  • International Recipes
  • South Indian
    • Festival Recipes
    • Rice Recipes
    • Side dish for Rice
    • Lunch Recipes
  • Contact Me

Rice Recipes

April 28, 2015 Baked Recipes

Apple Flapjacks

Apple Flapjacks

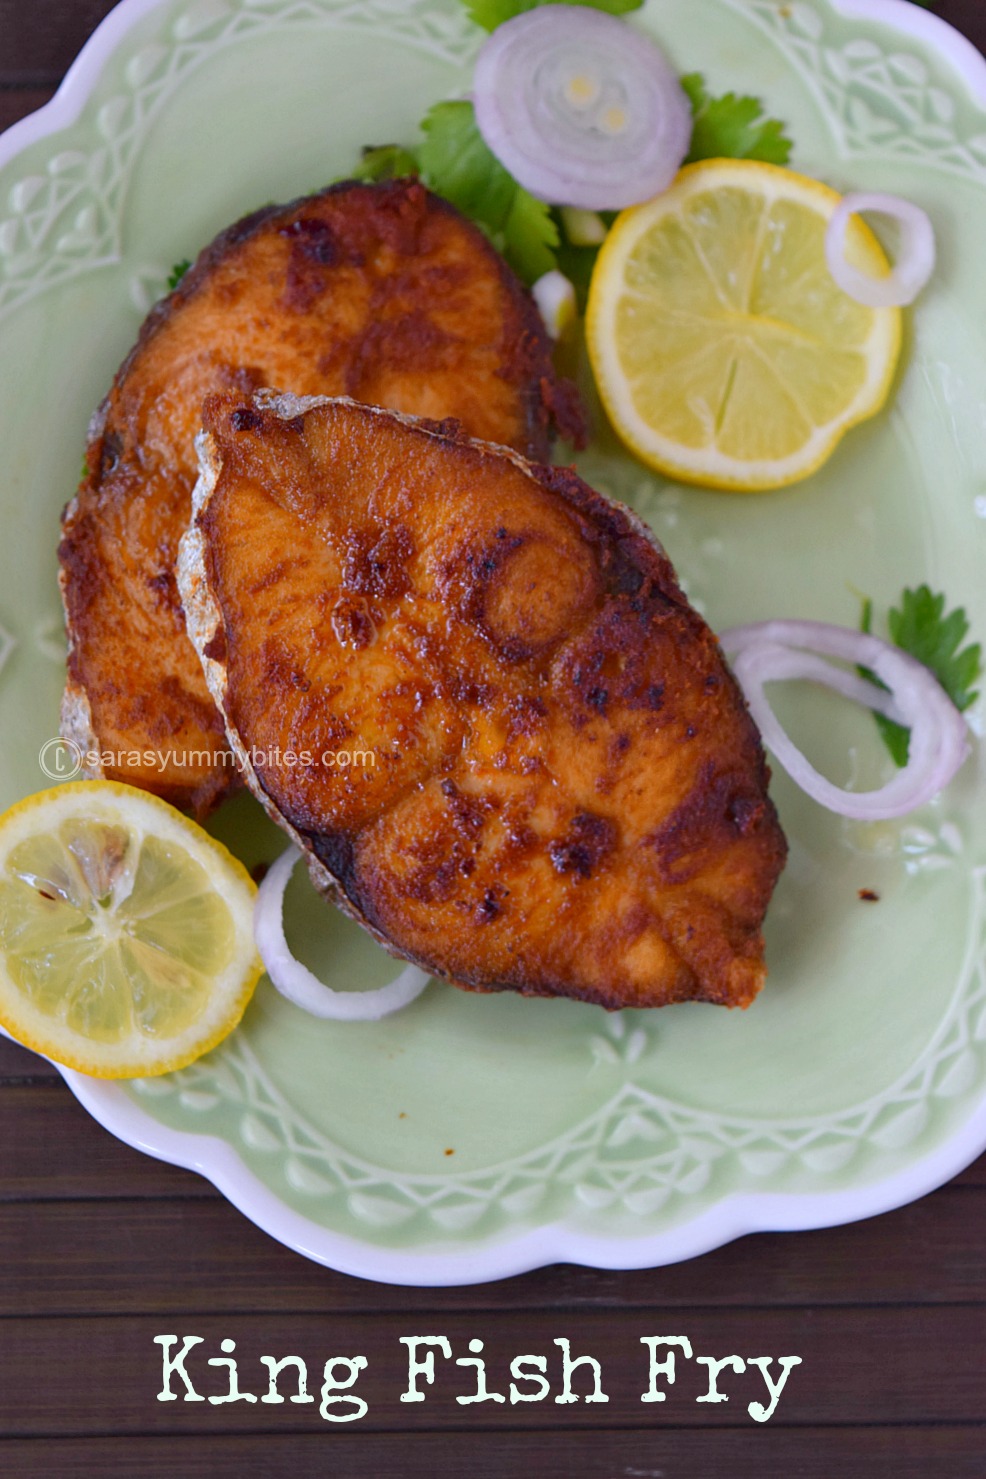
                  Flapjack is a sweet chewy English cake or bar made from a mixture of oats, golden syrup/corn syrup and butter.   A traditional Flapjack is one of the quickest, easiest and  made with available ingredients  at home.  And also healthy as it is made mainly from oats which are full of iron, zinc and vitamin B, so you can eat them without too much guilt. They are usually baked in a flat tin and cut into squares or rectangles while still warm. Try this, enjoy any time in a day..

Preparation time: 15 minutes
Baking time: 30 minutes
Serves : 4
Adapted from here
Ingredients:
1 lb / ½ kg apples 
½ cup /100 g oats
1 ¼ oz / 35 ml honey
5 tbsp / 75 butter
2 tbsp + 1 tsp / 40 g sugar
Pinch of salt
Pinch of ground ginger
Method


1. Preheat oven at 35o F and meantime grease the baking pan ( 6 inch pan for thicker slice or 8 inch pan for thinner slice). 
2. Peeled, cored and chopped or grated apples and cook it gently in a covered sauce pan with the sugar, until it becomes a soft. 
3. Add the butter and honey. Mix and cook it low heat.
4. Gently stir in the oats, salt and ginger to coat through. 
5. Transfer the mixture into a buttered cake tin (I quarter the recipe and used 6 inch pan) and bake in the oven at 350 F for 30 mins. Allow to cool before turning out. And store the flapjacks in an air-tight container for up to 4 days.
Apple Flapjacks
PRINT HERE
Apple Flapjacks
Preparation time: 15 minutes

Baking time: 30 minutes
Serves : 4
Adapted from here
Ingredients:
1 lb / ½ kg apples 
½ cup /100 g oats
1 ¼ oz / 35 ml honey
5 tbsp / 75 butter
2 tbsp + 1 tsp / 40 g sugar
Pinch of salt
Pinch of ground ginger
Method
1. Preheat oven at 35o F and meantime grease the baking pan ( 6 inch pan for thicker slice or 8 inch pan for thinner slice). 
2. Peeled, cored and chopped or grated apples and cook it gently in a covered sauce pan with the sugar, until it becomes a soft. 
3. Add the butter and honey. Mix and cook it low heat.
4. Gently stir in the oats, salt and ginger to coat through. 
5. Transfer the mixture into a buttered cake tin (I quarter the recipe and used 6 inch pan) and bake in the oven at 350 F for 30 mins. Allow to cool before turning out. And store the flapjacks in an air-tight container for up to 4 days.

 www.sarasyummyrecipes.com

Check out the Blogging Marathon page for the other Blogging Marathoners doing BM# 51

An InLinkz Link-up


April 27, 2015 Baked Recipes

Creamy Broccoli Pot Pies

Creamy Broccoli Pot Pies

A pot pie are generally made of flaky pastry as a topping and filled with various type of filling. And it is a ultimate comfort food, which can be prepared in multiple flavors, either savory or sweet. Today I have used broccoli with white sauce and avoided cheese. You can alter this recipe with your choice of filling and spice.

Preparation time: 15 minutes
Cook time: 15 minutes
Baking time: 15 minutes
Yield: 4
Adapted from here

Ingredients:
1 cup milk or whip cream for richness
3 tbsp. all-purpose flour
2 cups steamed broccoli florets (about 2 small heads of broccoli)
Salt + Pepper to taste pinch
1 sheet puff pastry or phyllo sheets
Milk for brushing

Method:
1. Preheat oven to 425 degrees, grease ramekin pan with oil.  Meantime wash and cut the broccoli in to florets. Place the florets on steamer over boiling water , cover and cook it for 5 minutes. Set aside till use.
2. In a large sauce pan, combine milk and flour over a medium heat.
3. Bring mixture to boil and whisking constantly. Reduce heat to low and stir continuously for 3 ~ 5 minutes, until mixture is thick, continuing to whisk.
4. Remove from heat ( Add ¼ cup of cheddar cheese this time, if you prefer for it).  Add salt and pepper to taste.  Now sauce will be very thick consistency.
5. Cut phyllo sheets in to four square ( Thaw before using). Or use puff pastry instead of phyllo sheets.
6. Divide broccoli and cheese mixture into four ramekins and top each ramekin with phyllo sheets/ puff pastry. Brush the sheet with milk or egg wash.

Baking:

7. Bake for 12 ~14 minutes or until puff pastry is puffy and golden brown.

Creamy Broccoli Pot Pies


PRINT HERE
Creamy Broccoli Pot Pies
Preparation time: 15 minutes
Cook time: 15 minutes
Baking time: 15 minutes
Yield: 4Ingredients:
1 cup milk or whip cream for richness
3 tbsp. all-purpose flour
2 cups steamed broccoli florets (about 2 small heads of broccoli)
Salt + Pepper to taste pinch
1 sheet puff pastry or phyllo sheets
Milk for brushing

Method:
1. Preheat oven to 425 degrees, grease ramekin pan with oil.  Meantime wash and cut the broccoli in to florets. Place the florets on steamer over boiling water , cover and cook it for 5 minutes. Set aside till use.
2. In a large sauce pan, combine milk and flour over a medium heat.
3. Bring mixture to boil and whisking constantly. Reduce heat to low and stir continuously for 3 ~ 5 minutes, until mixture is thick, continuing to whisk.
4. Remove from heat ( Add ¼ cup of cheddar cheese this time, if you prefer for it).  Add salt and pepper to taste.  Now sauce will be very thick consistency.
5. Cut phyllo sheets in to four square ( Thaw before using). Or use puff pastry instead of phyllo.
6. Divide broccoli and cheese mixture into four ramekins and top each ramekin with phyllo sheets/ puff pastry. Brush the sheet with milk or egg wash.

Baking:

7. Bake for 12~14 minutes or until puff pastry is puffy and golden brown.

Check out the Blogging Marathon page for the other Blogging Marathoners doing BM# 51

An InLinkz Link-up


April 23, 2015 Baked Recipes

Damper - AustralianTraditional Home-made Bread

Damper is a traditional Australian soda bread. It consists of a wheat flour, milk or water, baking powder and traditionally baked in the coals of a campfire.  It was normally eaten with dried or cooked meat or golden syrup or Honey.  This simple recipe dont need proofing time and very easy quick to make.

Preparation time: 10 minutes

Baking time: 30 minutes
Yield:  1 big damper bread or 2 medium size damper as shown in picture
Adapted from here
Ingredients
3 cups / 450grams self-raising flour or wheat flour
A Pinch of salt
5 tbsp + 1 tsp / 80grams butter, chilled, cubed
¾ cup / 185ml water
Method
Preparation:
1. Preheat oven to 200°C. Line a baking tray with non-stick baking paper. Combine the flour and salt     in a large bowl.
2. Using stand mixer or your fingertips,  rub the butter into the flour until the mixture resembles fine       breadcrumbs.

3. Add the water to the flour mixture  and knead it in to soft dough, add 1-2 tablespoons extra water if     the mixture is a little dry. Continue to knead in stand mixer for 5 ~ 6 minutes or else use your             hand  to bring the mixture together and turn the dough onto a lightly floured surface and knead       gently for 1- 2 minutes or until smooth.

4. Shape into an 18cm disc and place on tray. Use a sharp knife that has been dipped in flour to mark     8 wedges on top.
Baking:


5. Dust the damper with a little extra flour and bake in preheated oven for 30 minutes or until the            damper is cooked through and sounds hollow when tapped on the base. Transfer to a wire rack for 5    minutes to cool slightly. Serve warm or at room temperature.

PRINT HERE
Australian Bread ~ Damper 
 
Preparation time: 10 minutes
Baking time: 30 minutes
Yield:  1 big damper bread or 2 medium size damper as shown in picture
Adapted from here

Ingredients
3 cups / 450grams self-raising flour or wheat flour ( see notes)
A Pinch of salt
5 tbsp + 1 tsp / 80grams butter, chilled, cubed
¾ cup / 185ml water

Method
Preparation:
1. Preheat oven to 200°C. Line a baking tray with non-stick baking paper. Combine the flour and salt     in a large bowl.
2. Using stand mixer or your fingertips,  rub the butter into the flour until the mixture resembles fine       breadcrumbs.
3. Add the water to the flour mixture  and knead it in to soft dough, add 1-2 tablespoons extra water if     the mixture is a little dry. Continue to knead in stand mixer for 5 ~ 6 minutes or else use your             hands      to bring the mixture together and turn the dough onto a lightly floured surface and knead       gently for 1-     2 minutes or until smooth.
4. Shape into an 18cm disc and place on tray. Use a sharp knife that has been dipped in flour to mark     8 wedges on top.

Baking:
5. Dust the damper with a little extra flour and bake in preheated oven for 30 minutes or until the damper is cooked through and sounds hollow when tapped on the base. Transfer to a wire rack for 5 minutes to cool slightly. Serve warm or at room temperature.

      www. sarasyummyrecipes.com

Check out the Blogging Marathon page for the other Blogging Marathoners doing BM# 51

An InLinkz Link-up


April 22, 2015 Baked Recipes

Kourabiethes / Greek Shortbread

Kourabiethes / Greek Shortbread
Preparation time 20 minutes
Baking time 10 ~ 15 minutes
Makes 20 ~ 24
Ingredients:
½ cup salter butter, soften 
¼ cup + 2 tbsp superfine ( caster) sugar
1 large egg
½ tsp vanilla essence 
1 ¼ cup all purpose flour
Add ¼ tsp of salt if you are not using salted butter
Method:
1. Preheat the oven to 400F / 200C. Grease two large baking sheet with parchment paper or use silpat mat.
2. Using electric mixer, beat butter and sugar in a medium bowl on medium speed until pale and creamy.


3. In a small bowl, beat the egg with fork to mix yellow and white together. Add half of the egg to the butter mixer and beat until just combined.  Reserve remaining eggs for later use.

4.  With the mixer on low speed, beat in vanilla followed by the flour. Dough will be firm. If not add little flour to get firm dough( dough should not be sticky and not like chapati dough).

Kourabiethes / Greek Shortbread
5. Divide the dough in to equal no of portions and shape it into twists. Place the cookies 2 inches apart on the prepared baking sheets. Brush with remaining egg.
Baking:
6. Bake for 10 ~ 15 minutes, until lightly browned and firm. Remove and allow the cookies on the baking sheets until they harden a little. Then transfer to cooling racks and let cool completely. Store it in air tight container.

Kourabiethes / Greek Shortbread
PRINT HERE
Greek Shortbread

Preparation time 20 minutes

Baking time 10 ~ 15 minutes
Makes 20 ~ 24

Ingredients:
½ cup salter butter, soften
¼ cup + 2 tbsp superfine ( caster) sugar
1 large egg
½ tsp vanilla essence
1 ¼ cup all purpose flour
Add ¼ tsp of salt if you are not using salted butter

Method:
1. Preheat the oven to 400F / 200C. Grease two large baking sheet with parchment paper or use silpat mat.
2. Using electric mixer, beat butter and sugar in a medium bowl on medium speed until pale and creamy.
3. In a small bowl, beat the egg with fork to mix yellow and white together. Add half of the egg to the butter mixer and beat until just combined.  Reserve remaining eggs for later use.
4.  With the mixer on low speed, beat in vanilla followed by the flour. Dough will be firm. If not add little flour to get firm dough( dough should not be sticky and not like chapati dough).
5. Divide the dough in to equal no of portions and shape it into twists. Place the cookies 2 inches apart on the prepared baking sheets. Brush with remaining egg.

Baking:
6. Bake for 10 ~ 15 minutes, until lightly browned and firm. Remove and allow the cookies on the baking sheets until they harden a little. Then transfer to cooling racks and let cool completely. Store it in air tight container.

      www. sarasyummyrecipes.com
Kourabiethes / Greek Shortbread

Check out the Blogging Marathon page for the other Blogging Marathoners doing BM# 51

An InLinkz Link-up


April 20, 2015 Baked Recipes

Eggless Orange Chocolate cup cake with Orange Butter cream Frosting

Eggless Orange Chocolate cup cake with Orange Butter cream Frosting

                   This orange chocolate cake with orange frosting is a winning recipe in any crowd. Chocolate and Orange pair up very well and they taste delicious.  And interesting part is,  it doesn't have eggs.  And I skipped mayo and added yogurt. which is equally good.. Try this and enjoy this scrumptious flavors from chocolate and Orange.
 

Preparation time: 10 minutes
Baking time: 20 to 25 minutes for cup cake OR 45 minutes for  1 bundt pan
Serves: 12
For the cake:
Dry Ingredients:
2 tbsp unsalted butter, softened
½ cup plus 1 tsp unsweetened cocoa powder
3 cups all-purpose flour
1 ½ cups granulated sugar
2 tsp baking soda
1 tsp salt
1 tsp ground cinnamon
Wet Ingredients:
2 cups freshly squeezed orange juice, plus 2 tablespoons finely grated zest
¾ cup mayonnaise or ⅔ cup of greek yogurt 
2 tbsp vinegar
1 tsp vanilla extract
Eggless Orange Chocolate cup cake with Orange Butter cream Frosting
Method:
For the cake:
1.  Preheat the oven to 350 degrees F.  Mix together the softened butter and 1 tablespoon of the cocoa to make a thick paste. Coat this paste as a paint, inside of the Bundt cupcake pan. Set aside.
2. In an electric mixer, combine the flour, granulated sugar, baking soda, salt, cinnamon and remaining ½ cup cocoa and mix until blended. 
3. Add the orange juice, mayonnaise, vinegar and vanilla and mix until just combined, 1 to 2 minutes. 4. Fold in the orange zest. Pour the batter into the prepared pan.

Baking:
5. Bake the cake until a toothpick inserted in the cake comes out clean or 20 minutes for cupcakes and 45 minutes for single bundt pan. 
6. Cool in the pan for 10 minutes, and then turn out onto a cooling rack to cool completely.

Eggless Orange Chocolate cup cake with Orange Butter cream Frosting
For Orange Buttercream Frosting:
Ingredients:
¾ cup butter, softened  
2 tsp grated orange rind  
1 (16-oz.) package confectioners sugar
2 to 3 tbsp orange juice 
Dash of peach food color
Method:
1. Beat butter and orange rind at medium speed with an electric mixer until creamy. Gradually add confectioners sugar, beating until well blended.
2. Stir in 2 tbsp. orange juice, adding additional orange juice, if necessary, to reach desired consistency.
  Adapted from Food Network

Eggless Orange Chocolate cup cake with Orange Butter cream Frosting


PRINT HERE
Eggless Orange Chocolate cup cake with Orange Butter cream Frosting

Preparation time: 10 minutes

Baking time: 20 to 25 minutes for cup cake OR 45 minutes for  1 bundt pan
Serves: 12

For the cake:
Dry Ingredients:
2 tbsp unsalted butter, softened
½ cup plus 1 tsp unsweetened cocoa powder
3 cups all-purpose flour
1 ½ cups granulated sugar
2 tsp baking soda
1 tsp salt
1 tsp ground cinnamon

Wet Ingredients:
2 cups freshly squeezed orange juice, plus 2 tablespoons finely grated zest
¾ cup mayonnaise or ⅔ cup of greek yogurt
2 tbsp vinegar
1 tsp vanilla extract

Method:
For the cake:
1.  Preheat the oven to 350 degrees F.  Mix together the softened butter and 1 tablespoon of the cocoa to make a thick paste. Coat this paste as a paint, inside of the Bundt cupcake pan. Set aside.
2. In an electric mixer, combine the flour, granulated sugar, baking soda, salt, cinnamon and remaining ½ cup cocoa and mix until blended.
3. Add the orange juice, mayonnaise, vinegar and vanilla and mix until just combined, 1 to 2 minutes. 4. Fold in the orange zest. Pour the batter into the prepared pan.


Baking:
5. Bake the cake until a toothpick inserted in the cake comes out clean or 20 minutes for cupcakes and 45 minutes for single bundt pan.
6. Cool in the pan for 10 minutes, and then turn out onto a cooling rack to cool completely.

For Orange Buttercream Frosting:

Ingredients:
¾ cup butter, softened
2 tsp grated orange rind
1 (16-oz.) package confectioners sugar
2 to 3 tbsp orange juice
Dash of peach food color

Method:

1. Beat butter and orange rind at medium speed with an electric mixer until creamy. Gradually add confectioners sugar, beating until well blended.

2. Stir in 2 tbsp. orange juice, adding additional orange juice, if necessary, to reach desired consistency.

      www. sarasyummyrecipes.com

Check out the Blogging Marathon page for the other Blogging Marathoners doing BM# 51

An InLinkz Link-up


April 16, 2015 Baked Recipes

Mini Chocolate Tart

Mini Chocolate Tart

  This recipe is easy and quick recipe which serves as appetizer or dessert depends on the filling for huge crowd with out much effort. Made this for get together party at my home and it was super hit among the crowd, especially with kids.. They started to enjoy this mini bites and asked for more. One good thing about these cups are, it doesn't requires thawing.  When you crave for some. just pop this cold puff cups in to the preheat oven and enjoy the way you wanted.. Super easy.. isn't ??

Preparation time: 5 minutes

Baking time: 20 minutes
Makes  24
Adapted from  Pepperidge Farm  
Ingredients:
1 ⅛″ thick, 4″ circle cold Puff Pastry  
4 oz  semi sweet chocolate chunks as needed
1 cup whip cream 
3 tbsp icing sugar or as needed
Strawberry or cherries for garnishing
Method:
Preparation and Baking:

1. Center a rack in the oven and preheat the oven to 400 degrees F. Line a baking sheet with parchment paper or a silicone mat and put the pastry circle on the sheet.
2. Bake the tartlet for about 20 minutes until the pastry is deeply browned and puffed up well.
3. Transfer the tartlet and allow it to cool for 10 minutes.
Assembling the tartlet:
4. Melt the chocolate in double boiler method or using microwave. 
5. Meantime using electric mixer or stand mixer, whisk cream and sugar till it form stiff peak. Transfer the cream to piping bag with star nozzle. 
6. Gently press the center of the baked pastry and pipe in the melted chocolate. You can refrigerate with chocolate filled pastry till use. 
(OR)
7. Pipe the whipped cream over the chocolate filled tartlet and top it with fruit and serve immediately.  For parties or get together , you can refrigerate the baked tartlet and pipe it with cream before serving.

Mini Chocolate Tart
PRINT HERE
Mini Chocolate Tart

Preparation time: 5 minutes

Baking time: 20 minutes
Makes 24
Adapted from  Pepperidge Farm  
Ingredients:
1 ⅛″ thick, 4″ circle cold Puff Pastry  
4 oz  semi sweet chocolate chunks as needed
1 cup whip cream 
3 tbsp icing sugar or as needed
Strawberry or cherries for garnishing
Method:
Preparation and Baking:
1. Center a rack in the oven and preheat the oven to 400 degrees F. Line a baking sheet with parchment paper or a silicone mat and put the pastry circle on the sheet.
2. Bake the tartlet for about 20 minutes until the pastry is deeply browned and puffed up well.
3. Transfer the tartlet and allow it to cool for 10 minutes.

Assembling the tartlet:
4. Melt the chocolate in double boiler method or using microwave. 
5. Meantime using electric mixer or stand mixer, whisk cream and sugar till it form stiff peak. Transfer the cream to piping bag with star nozzle. 
6. Gently press the center of the baked pastry and pipe in the melted chocolate. You can refrigerate with chocolate filled pastry till use. 
(OR)

7. Pipe the whipped cream over the chocolate filled tartlet and top it with fruit and serve immediately.  For parties or get together , you can refrigerate the baked tartlet and pipe it with cream before serving.       www. sarasyummyrecipes.com

Mini Chocolate Tart

Check out the Blogging Marathon page for the other Blogging Marathoners doing BM# 51

An InLinkz Link-up


PRINT HERE

April 16, 2015 Baked Recipes

Potato Lemon Loaf with Rosemary


Preparation time: 15 minutes
Baking time: 40 ~ 45 minutes
Serves 8
 
Ingredients for Topping:
2 tbsp finely grated lemon zest
2 tbsp fresh rosemary
2 tbsp pine nuts
 
Wet Ingredients:
1 cup / 250 ml buttermilk 
1 tbsp extra virgin olive oil
2 tbsp freshly squeezed lemon juice
1 tsp red chili paste or chili flakes(use it in dry ingredients) to taste
1 tbsp freshly grated parmesan cheese  
 
Dry Ingredients:
2 cups / 300 grams all purpose flour + 1 tbsp extra flour
2 tsp baking powder
¾ tsp salt or to taste
1 cup / 150 grams grated potato or parsnip


Potato Lemon Loaf with Rosemary


Method:
Preparation
1. Preheat oven to 375 F / 190 C. Grease 9 X 5 inch loaf pan. ( I halved the recipe and used mini loaf pan).
2. Combine the lemon zest, rosemary, and pine nuts in a bow. Mix all dry ingredients in a separate  bowl.
Potato Lemon Loaf with Rosemary
 
Potato Lemon Loaf with Rosemary
 

3. Whisk the wet ingredients in a small bowl. Pour in to the dry ingredients and mix to form a soft sticky dough.

Potato Lemon Loaf with Rosemary


Potato Lemon Loaf with Rosemary


Potato Lemon Loaf with Rosemary

4. Fill the greased pan with half of the dough and gently press evenly.  Sprinkle with half the pine nut mixture. Press remaining dough above the sprinkle mixture and spread evenly. Top the remaining pine nut mixture with extra flour.

 
Baking:

Potato Lemon Loaf with Rosemary
 

5. Bake the loaf at preheated oven for 40~ 45 minutes, until golden brown. Serve warm along with bowl of soup.


Potato Lemon Loaf with Rosemary


PRINT HERE
Potato Lemon Loaf with Rosemary
 
Preparation time: 15 minutes


Baking time: 40 ~ 45 minutes
Serves 8
 
Ingredients for Topping:
2 tbsp finely grated lemon zest
2 tbsp fresh rosemary
2 tbsp pine nuts
 
Wet Ingredients:
1 cup / 250 ml buttermilk 
1 tbsp extra virgin olive oil
2 tbsp freshly squeezed lemon juice
1 tsp red chili paste or chili flakes(use it in dry ingredients) to taste
1 tbsp freshly grated parmesan cheese  
 
Dry Ingredients:
2 cups / 300 grams all purpose flour + 1 tbsp extra flour
2 tsp baking powder
¾ tsp salt or to taste
1 cup / 150 grams grated potato or parsnip
 
Method:
Preparation
1. Preheat oven to 375 F / 190 C. Grease 9 X 5 inch loaf pan. ( I halved the recipe and used mini loaf pan).
2. Combine the lemon zest, rosemary, and pine nuts in a bow. Mix all dry ingredients in a separate  bowl.
3. Whisk the wet ingredients in a small bowl. Pour in to the dry ingredients and mix to form a soft sticky dough.
4. Fill the greased pan with half of the dough and gently press evenly.  Sprinkle with half the pine nut mixture. Press remaining dough above the sprinkle mixture and spread evenly. Top the remaining pine nut mixture with extra flour.
 
Baking:
5. Bake the loaf at preheated oven for 40~ 45 minutes, until golden brown. Serve warm along with bowl of soup.


Original recipe from Baking  www. sarasyummyrecipes.com


Check out the Blogging Marathon page for the other Blogging Marathoners doing BM# 51


An InLinkz Link-up


April 14, 2015 Baked Recipes

Eggless Banana Bread


Preparation time:  15 ~ 20 minutes
Baking time:  45 minutes + 25 minutes 
Yield: 1 -  9" x 5" loaf pan or 12" x 4" tea loaf pan
Adapted from here

Ingredients:
½ cup unsalted butter, at cool room temperature
⅔ cup brown sugar, light or dark, firmly packed
1 tsp vanilla extract
1 tsp cardamom powder  (OR) 1 tsp ground cinnamon and ¼ tsp ground nutmeg
1 tsp baking soda
1 tsp baking powder
1 tsp salt
1 ½ cups mashed ripe bananas (about 3 medium or 2 large bananas)
3 tbsp apricot jam or orange marmalade
¼ cup honey
2 tbsp flex seeds + 6 tbsp water (OR) 2 large eggs
2 ¼ cups all-purpose flour
½ cup chopped walnuts, optional

Eggless Banana Bread
Method:
Preparation:
1.  Preheat the oven to 325°F. Lightly grease a 9" x 5" loaf pan; or a 12" x 4" tea loaf pan. Mix flex seeds and water in a small bowl and letting it to rest for 5 minutes to get  a sticky mixture.

2. Using stand mixer, hand mixer or using spatula, combine the butter, sugar, vanilla,  cinnamon, nutmeg, baking soda, baking powder, and salt, beating till smooth in a large bowl.

3. Add the mashed bananas, jam, honey, and flex seeds, again beating until smooth.
4. Add the flour, then the nuts, stirring just until smooth.

5. Spoon the batter into the prepared loaf pan, smoothing the top. Let it rest at room temperature for  10 minutes.  Sprinkle broken nuts on the bread.


Baking:

6. Bake the bread for 45 minutes, then gently lay a piece of aluminum foil across the top, to prevent over-browning.
7. Bake for an additional 25 minutes (20 minutes if you're baking in a tea loaf pan) or till inserted toothpick in center of the bread come out clean. If not, bake the bread,  an additional 5 minutes.
8. Allow the bread to cool for 10 minutes in the pan. Remove it from the pan, and cool it completely on a rack.
Eggless Banana Bread
PRINT HERE
Eggless Banana Bread
 
Preparation time: 15 ~ 20 minutes 

Baking time:  45 minutes + 25 minutes 
Yield: 1 -  9" x 5" loaf pan or 12" x 4" tea loaf pan
Ingredients:
½ cup unsalted butter, at cool room temperature
⅔ cup brown sugar, light or dark, firmly packed
1 tsp vanilla extract
1 tsp cardamom powder  (OR) 1 tsp ground cinnamon and ¼ tsp ground nutmeg
1 tsp baking soda
1 tsp baking powder
1 tsp salt
1 ½ cups mashed ripe bananas (about 3 medium or 2 large bananas)
3 tbsp apricot jam or orange marmalade
¼ cup honey
2 tbsp flex seeds + 6 tbsp water (OR) 2 large eggs
2 ¼ cups all-purpose flour
½ cup chopped walnuts, optional
Method:
Preparation:
1.  Preheat the oven to 325°F. Lightly grease a 9" x 5" loaf pan; or a 12" x 4" tea loaf pan. Mix flex seeds and water in a small bowl and letting it to rest for 5 minutes to get  a sticky mixture.
2. Using stand mixer, hand mixer or using spatula, combine the butter, sugar, vanilla,  cinnamon, nutmeg, baking soda, baking powder, and salt, beating till smooth in a large bowl.
3. Add the mashed bananas, jam, honey, and flex seeds, again beating until smooth.
4. Add the flour, then the nuts, stirring just until smooth.
5. Spoon the batter into the prepared loaf pan, smoothing the top. Let it rest at room temperature for  10 minutes.  Sprinkle broken nuts on the bread.
Baking:
6. Bake the bread for 45 minutes, then gently lay a piece of aluminum foil across the top, to prevent over-browning.
7. Bake for an additional 25 minutes (20 minutes if you're baking in a tea loaf pan) or till inserted toothpick in center of the bread come out clean. If not, bake the bread,  an additional 5 minutes.
8. Allow the bread to cool for 10 minutes in the pan. Remove it from the pan, and cool it completely on a rack.

Recipe adapted from kingarthurflour      www.sarasyummyrecipes.com        


Check out the Blogging Marathon page for the other Blogging Marathoners doing BM# 51

An InLinkz Link-up


April 13, 2015 Baked Recipes

Eggless Extra Nutty Chocolate Brownies

Eggless Extra Nutty Chocolate Brownies

This chocolate brownie recipe was in my to do list for a month, When my blogger friend Gayathri Kumar announced it in her Baking Eggless group.  This super easy recipe was adapted from below link and I changed it to butterless and eggless for healthier options.  If you are a chocolate lover then you’re in for one amazingly indulgent treat!

Preparation time: 10 minutes

Baking time: 25 ~ 30 minutes
Serves 8
Adapted from here
Dry Ingredients:
¾ cup all purpose flour
½ cup cocoa powder
¾ tsp baking powder
¼ tsp salt
¾ cup granulated sugar
⅓ cup nuts or chocolate chips
Wet Ingredients:
½ cup cooking oil or melted butter
2 tbsp flex seeds + 6 tbsp water
1 tsp vanilla extract
Method:
1. Preheat oven to 350 degrees F and spray 8 inch cake pan with cooking oil and fit with greased parchment paper. Set aside till use.

2. Mix flex seeds and water in a small bowl and letting it to rest for 5 minutes to get  a sticky mixture.
3. Mix in all dry ingredients except nuts or choco chip in a large mixing bowl.

4. In another mixing bowl, take wet ingredients and whisk to combine.  Then gently fold in dry ingredients to combine.

5. Transfer the mixture to greased pan and gently level it with your spatula. Top it with desired nuts and gently press the nuts in to the mixture. ( If you are using choco chip, fold it in the mixture finally.

 
Baking: 
6. Bake the brownies for 25 ~ 30 minutes or until the brownies start to pull away from the sides and they spring back slightly to the touch. Be careful not to overcook or they will get crumbly.

Cooling:

7. Remove from oven and let rest in the tin for 5 minutes before removing to cool completely on a plate or cooling rack.
8. Store in an airtight container to keep fresh for a couple days. Freeze to store long.

Eggless Extra Nutty Chocolate Brownies
PRINT HERE
Eggless Extra Nutty Chocolate Brownies
Preparation time: 10 minutes 

Baking time: 25 ~ 30 minutes
Serves 8

Dry Ingredients:
¾ cup all purpose flour
½ cup cocoa powder
¾ tsp baking powder
¼ tsp salt
¾ cup granulated sugar
⅓ cup nuts or chocolate chips

Wet Ingredients:
½ cup cooking oil or melted butter
2 tbsp flex seeds + 6 tbsp water
1 tsp vanilla extract

Method:
1. Preheat oven to 350 degrees F and spray 8 inch cake pan with cooking oil and fit with greased parchment paper. Set aside till use.
2. Mix flex seeds and water in a small bowl and letting it to rest for 5 minutes to get a sticky mixture.
3. Mix in all dry ingredients except nuts or choco chip in a large mixing bowl.
4. In another mixing bowl, take wet ingredients and whisk to combine.  Then gently fold in dry ingredients to combine.
5. Transfer the mixture to greased pan and gently level it with your spatula. Top it with desired nuts and gently press the nuts in to the mixture. ( If you are using choco chip, fold it in the mixture finally.


Baking: 
6. Bake the brownies for 25 ~ 30 minutes or until the brownies start to pull away from the sides and they spring back slightly to the touch. Be careful not to overcook or they will get crumbly.

Cooling:
7. Remove from oven and let rest in the tin for 5 minutes before removing to cool completely on a plate or cooling rack.
8. Store in an airtight container to keep fresh for a couple days. Freeze to store long.toaster.    www.sarasyummyrecipes.com        


Check out the Blogging Marathon page for the other Blogging Marathoners doing BM# 51

An InLinkz Link-up


April 12, 2015 Baked Recipes

Cheesy Onion Scones

A scone is a single-serving cake or quick bread. They are usually made of wheat, barley or oatmeal, with baking powder as a leavening agent, and are baked on sheet pans. They are often lightly sweetened and are occasionally glazed.   These delicious scones often served as breakfast or any time snack. Thanks Priya Suresh for challenging this wonderful recipe for Home Bakers Challenge..
Preparation time: 10 minutes
Baking time : 20 ~ 25 minutes depends on size of the scone
Yield: 16 wedges
Adapted from Recipe Net
 
Ingredients:
3 cups all purpose flour
1 tablespoon baking powder
1 teaspoon salt or to taste
Red chili powder to your taste
¼ cup finely chopped fresh rosemary ( Original recipe cal for chives, but I added onion and rosemary or you can add other herbs as per the availability).
1 ½ cup /5 oz shredded parmesan cheese ( recipe called for extra sharp cheddar cheese)
¼ cup chopped onion
2 cups heavy cream plus or plain yogurt with pinch of baking soda  for healthier option

Method:
1. Preheat the oven  to 400 ° F. Mean time In a large mixing bowl, whisk flour, baking powder, salt together. Then add rosemary, onion and cheese, tossing to combine.

Cheesy Onion Scones
Cheesy Onion Scones
Cheesy Onion Scones
Cheesy Onion Scones
2. Stir in cream with a fork until a sticky dough forms. If needed add extra moisture to your dough.
3. Turn dough out onto a lightly floured surface and knead 8 times with floured hands.

4. Halve dough and form each half into a 7-inch round. Brush tops of rounds with additional cream. Cut each into 8 wedges.

5. Sprinkle some cheese on each scone before baking.
Baking:
6. Arrange wedges about ½ inch apart on an un-greased large baking sheet & bake in middle of oven until golden brown, about 20 minutes.
7. Cool on a rack. Store leftovers in the refrigerator and reheat in toaster.

PRINT HERE
Cheesy Onion Scones
Preparation time: 10 minutes  

Baking time : 20 ~ 25 minutes depends on size of the scone
Yield: 16 wedges
Ingredients:
3 cups all purpose flour
1 tablespoon baking powder
1 teaspoon salt or to taste
Red chili powder to your taste
1/ 4 cup finely chopped fresh rosemary ( Original recipe cal for chives, but I added onion and rosemary or you can add other herbs as per the availability).
1 ½ cup /5 oz shredded parmesan cheese ( recipe called for extra sharp cheddar cheese)
¼ cup chopped onion
2 cups heavy cream plus or plain yogurt with pinch of baking soda  for healthier option
Method:
1. Preheat the oven  to 400 ° F. Mean time In a large mixing bowl, whisk flour, baking powder, salt together. Then add rosemary, onion and cheese, tossing to combine.
2. Stir in cream with a fork until a sticky dough forms. If needed add extra moisture to your dough.
3. Turn dough out onto a lightly floured surface and knead 8 times with floured hands.
4. Halve dough and form each half into a 7-inch round. Brush tops of rounds with additional cream. Cut each into 8 wedges
5. Sprinkle some cheese on each scone before baking.
Baking:
6. Arrange wedges about ½ inch apart on an un-greased large baking sheet & bake in middle of oven until golden brown, about 20 minutes.

7. Cool on a rack. Store leftovers in the refrigerator and reheat in toaster.    www.sarasyummyrecipes.com        Adapted from Recipe Net

 
Cheesy Onion Scones
Linking this recipe to Home Bakers Challenge 
and also too

Check out the Blogging Marathon page for the other Blogging Marathoners doing BM# 51

An InLinkz Link-up


April 10, 2015 Baked Recipes

Eggfree Eggplant Herbs Muffins

Eggfree Eggplant Herbs Muffins
                       Eggplant Muffins ? Yeah you read it correctly. I too got puzzled when I first saw this recipe in a magazine and adapted it to my family taste with Eggfree option. You can go creative and substitute eggplant with any veggies and Herbs with any masala 's and make it as savory or sweet, by adding choco chip. I have added flex seed instead of eggs, oil for butter.  If you don't have flex seed then go head with ½ cup of curd.  I halved the original recipes and it has in between texture of  bajji and muffin.  I felt spicy level is milder for me ( I love spicy food and I can give ⅗ in spice scale) and enjoyed with coconut chutney :}

 
Preparation time: 10 ~ 15 minutes
Baking time: 20 minutes
Yield : 8 ~12 big size muffins

Dry Ingredients:
2 cups whole wheat flour
2 tbsp chopped mint
1 tbsp chopped rosemary
1 tbsp sugar
1 tsp baking powder
1 ½ tsp baking soda
1 tsp red chill powder or to taste
½ tsp crushed  black pepper or to taste
Salt to taste

Wet Ingredients:
2 tbsp ground flex seed
1 cup buttermilk
2 tbsp oil
2 tbsp minced onion or more to taste
2 cup cubed eggplant
1 tsp lemon zest

Method:
Preparation:
1. Preheat oven to 375°. Line the muffin tray with cupcake liners and set aside.


2.  In a large mixing bowl, mix dry ingredients and set aside. Meantime soak flex seed with 6 tbsp of  warm water. Mix and leave it for few seconds till it become viscous.


3. Once your flex seed is ready, gently mix and take sticky flex seed to another bowl along with buttermilk,oil, minced onion, chopped eggplant and zest. Mix the wet ingredient mixture.
4. Make a well at center of flour mixture and pour in wet ingredients.  Mix both mixture and transfer it to the prepared muffin pan equally. ( No need to mix the mixture too smooth and it will be thick bonda batter consistency).

Baking:
5. Bake the muffins at 375 F for 20 minutes or until inserted toothpick comes out clean.
6. Cool the muffins in the pan for 5 minutes and then cool it on cooling rack.. Serve warm. Good for a day, at room temperature or stay fresh for 2 ~ 3 days in refrigerator.

PRINT HERE
Eggfree Eggplant Herbs Muffins
Preparation time: 10 ~ 15 minutes 

Baking time: 20 minutes
Yield : 8 ~12 big size muffins
Dry Ingredients:
2 cups whole wheat flour
2 tbsp chopped mint 
1 tbsp chopped rosemary 
1 tbsp sugar
1 tsp baking powder
1 ½ tsp baking soda
1 tsp red chill powder or to taste
½ tsp crushed  black pepper or to taste
Salt to taste
Wet Ingredients:
2 tbsp ground flex seed 
1 cup buttermilk
2 tbsp oil
2 tbsp minced onion or more to taste
2 cup cubed eggplant
1 tsp lemon zest
Method:
Preparation:
1. Preheat oven to 375°. Line the muffin tray with cupcake liners and set aside.
2.  In a large mixing bowl, mix dry ingredients and set aside. Meantime soak flex seed with 6 tbsp of  warm water. Mix and leave it for few seconds till it become viscous.
3. Once your flex seed is ready, gently mix and take sticky flex seed to another bowl along with buttermilk,oil, minced onion, chopped eggplant and zest. Mix the wet ingredient mixture.
4. Make a well at center of flour mixture and pour in wet ingredients.  Mix both mixture and transfer it to the prepared muffin pan equally. ( No need to mix the mixture too smooth and it will be thick bonda batter consistency).
Baking:
5. Bake the muffins at 375 F for 20 minutes or until inserted toothpick comes out clean.
6. Cool the muffins in the pan for 5 minutes and then cool it on cooling rack.. Serve warm. Good for a day, at room temperature or stay fresh for 2 ~ 3 days in refrigerator.  

    Inspired from Vegetarian times                                                www.sarasyummyrecipes.com


Eggfree Eggplant Herbs Muffins

Check out the Blogging Marathon page for the other Blogging Marathoners doing BM# 51

An InLinkz Link-up


April 9, 2015 Baked Recipes

Eggless Zucchini Muffin

Eggless Zucchini Muffin
                  Muffins are always a healthier choice when compare to cupcakes. Which are very easy to make and quick to serve as small breads.. Muffins usually follow 'Mixing' method where dry ingredients and wet ingredients are taken in separate bowl and Then the two are quickly incorporated together with minimal mixing to avoid gluten development. This gives muffins a somewhat coarse crumb. 
               We can actually make it with 'N' no of healthier option with veggies, fruits, Nuts, whole grains etc. But we have to have a eye on fat and sugar we are adding to it and substitute it with oil and honey to make it more healthy.
                  Today I have added zucchini to my muffins by replacing eggs with curd. Do try with other vegetables or add any kind of nuts and spices as you like.. Now let get into the recipe..

Preparation time: 15 minutes
Baking time: 15 minutes
Yield: 12 muffins

Dry Ingredients
4.75 ounces / 1 cup whole-wheat flour  
3 ounces / ⅔ cup all-purpose flour
½ cup sugar ( ½ cup of sugar is too sweet for me, if you want, you can cut it down to ¼ cup as I did)
1 ¼ tsp baking powder
½ tsp baking soda
¼ tsp salt
Wet Ingredients:
1 ⅓ cups shredded zucchini
½ cup milk
2 tbsp canola oil
2 tbsp honey
¼ cup yogurt or 1 egg
1 tsp ground cardamom 
Eggless Zucchini Muffin
Method:
1. Preheat oven to 400°. Line the muffin tray with cupcake liners and set aside.

2. In a large mixing bowl, sieve dry ingredients. In another large bowl, mix wet ingredients together.

3. Make a well in center of flour mixture.  Add milk mixture, stirring just until moist.

4. Spoon batter into 12 muffin cups. Transfer filled muffin tray in to the oven.

Baking:
5. Bake at 400F for 15 minutes or until golden. Remove from pans immediately; cool on a wire rack.
PRINT HERE
Eggless Zucchini Muffin 
Preparation time: 15 minutes 

Baking time: 15 minutes
Yield: 12 muffins
Dry Ingredients
4.75 ounces / 1 cup whole-wheat flour  
3 ounces / ⅔ cup all-purpose flour
½ cup sugar
1 ¼ tsp baking powder
½ tsp baking soda
¼ tsp salt
Wet Ingredients:
1 ⅓ cups shredded zucchini
½ cup milk
2 tbsp canola oil
2 tbsp honey
¼ cup yogurt or 1 egg
1 tsp ground cardamom 
Method:
1. Preheat oven to 400°. Line the muffin tray with cupcake liners and set aside.
2. In a large mixing bowl, sieve dry ingredients. In another large bowl, mix wet ingredients together. 
3. Make a well in center of flour mixture.  Add milk mixture, stirring just until moist. 
4. Spoon batter into 12 muffin cups. Transfer filled muffin tray in to the oven.
Baking:
5. Bake at 400F for 15 minutes or until golden. Remove from pans immediately; cool on a wire rack.
Recipe adapted from Myrecipes      www.sarasyummyrecipes.com

Eggless Zucchini Muffin

Check out the Blogging Marathon page for the other Blogging Marathoners doing BM# 51

An InLinkz Link-up


April 8, 2015 Uncategorized

Eggless Butterless Honey Muffins

Eggless Butterless Honey Muffins
Preparation time: 10 minutes
Baking time: 12 ~ 15 minutes
yield: 12 muffins
Dry Ingredients:
2 cups all-purpose flour / whole wheat flour
½ cup granulated sugar
1 tablespoon baking powder
½ teaspoon salt
Wet Ingredients:
1 cup milk
¼ cup oil
¼ cup honey & 1 tsp vanilla extract
¼ cup pureed tofu or 1 egg

Eggless Butterless Honey Muffins

Method:
1. Preheat oven to 400 degrees F. Line a 12-cup muffin tin with paper liners or spray with a non-stick cooking spray.
2. In a large bowl, whisk together the dry ingredients.

3. In a another bowl, whisk together the milk, oil, honey, vanilla and pureed tofu.

4. Pour the wet ingredients into the dry ingredients and, using a rubber spatula, fold together until everything corporate together.

5. Divide the batter evenly between the muffin cups. Bake for 12 to 15 minutes, or until a toothpick inserted in the center comes out clean. Cool in the pan for 5 minutes, then remove to a wire rack. Serve warm or at room temperature or store it in zip lock bag for 3 day @ room temperature.

PRINT HERE
Eggless Butterless Honey Muffins

Preparation time: 10 minutes
Baking time: 12 ~ 15 minutes
yield: 12 muffins
Dry Ingredients:
2 cups all-purpose flour / whole wheat flour
½ cup granulated sugar
1 tablespoon baking powder
½ teaspoon salt
Wet Ingredients:
1 cup milk
¼ cup oil
¼ cup honey & 1 tsp vanilla extract
¼ cup pureed tofu or 1 egg
Method:
1. Preheat oven to 400 degrees F. Line a 12-cup muffin tin with paper liners or spray with a non-stick cooking spray.
2. In a large bowl, whisk together the dry ingredients.
3. In a another bowl, whisk together the milk, oil, honey, vanilla and pureed tofu.
4. Pour the wet ingredients into the dry ingredients and, using a rubber spatula, fold together until everything corporate together.
5. Divide the batter evenly between the muffin cups. Bake for 12 to 15 minutes, or until a toothpick inserted in the center comes out clean. Cool in the pan for 5 minutes, then remove to a wire rack. Serve warm or at room temperature or store it in zip lock bag for 3 day @ room temperature. 
(Recipe from Taste of Home)   www.sarasyummyrecipes.com

Check out the Blogging Marathon page for the other Blogging Marathoners doing BM# 51


An InLinkz Link-up


April 6, 2015 Uncategorized

Eggless Banana Choco Chop Muffin

Eggless Banana Choco Chop Muffin

Preparation time: 10 minutes
Baking time:  15 ~ 25 minutes depends upon the size of the muffin
Yield: 24 muffins 
Source: sarasyummybites
Dry Ingredients: 
1 cup / 130 grams all purpose flour
½ tsp baking soda
½ tsp baking powder
A pinch of salt
Wet Ingredients:
3tbsp + 1tsp / 50 grams butter @ room temperature
1 cup / 100 grams brown sugar 
2 ripe medium size bananas, mashed
½ cup choco chip cookies  or any nuts of your choice
½ cup / 118 ml milk 
1 tsp vanilla extract
½ tsp cardamom powder

Eggless Banana Choco Chop Muffin

Method:
1. Preheat oven to 350 F / 180 C. Line the muffin pan with cupcake liners and set aside till use.
2. Sieve dry ingredients together and keep it aside.

Eggless Banana Choco Chop Muffin

 3. Cream butter, sugar. Scrape the bowl and add mashed banana and mix will to blend the mashed bananas to the creamed butter sugar.   Now the mixture will be in curdled consistency.

Eggless Banana Choco Chop Muffin

Eggless Banana Choco Chop Muffin


4. Add dry ingredients. Mix again till it blend with wet ingredients.

Eggless Banana Choco Chop Muffin


5. Pour in milk to dilute the mixture. Followed by choco chips.

Eggless Banana Choco Chop Muffin

Baking:

6. Divide the mixture equally in muffin cups and bake it for 15 minutes or till you pass the toothpick test.

Eggless Banana Choco Chop Muffin

PRINT HERE
Eggless Banana Choco Chop Muffin

Preparation time: 10 minutes  

Baking time:  20 ~ 25 minutes depends upon the size of the muffin
Yield: 24 muffins
Source: sarasyummybites

Dry Ingredients: 
1 cup / 130 grams all purpose flour
½ tsp baking soda
½ tsp baking powder
A pinch of salt

Wet Ingredients:
3tbsp + 1tsp / 50 grams butter @ room temperature
1 cup / 100 grams brown sugar
2 ripe medium size bananas, mashed
½ cup choco chip cookies  or any nuts of your choice
½ cup / 118 ml milk
1 tsp vanilla extract
½ tsp cardamom powder

Method:
1. Preheat oven to 350 F / 180 C. Line the muffin pan with cupcake liners and set aside till use.
2. Sieve dry ingredients together and keep it aside.
3. Cream butter, sugar. Scrape the bowl and add mashed banana and mix will to blend the mashed bananas to the creamed butter sugar.   Now the mixture will be in curdled consistency.
4.Add dry ingredients. Mix again till it blend with wet ingredients

5. Pour in milk to dilute the mixture. Followed by choco chips.
Baking:
6. Divide the mixture equally in muffin cups and bake it for 20 minutes or till you pass the toothpick test.

www.sarasyummyrecipes.com
Eggless Banana Choco Chop Muffin

Check out the Blogging Marathon page for the other Blogging Marathoners doing BM# 51


An InLinkz Link-up


April 5, 2015 Baked Recipes

Sunflower Seeds Poha Cookies

Sunflower Seed Poha Cookies


         This Poha cookies are very similar to lacey cookies which are with crispier edges and chewy texture in middle with super thin layer. You can substitute poha with oats or you can you can skip sunflower seeds and use both poha and oats. Try this delicious recipe and enjoy your weekend..
Preparation time: 20 minutes
Baking time: 10 minutes
Yield : 20 ~ 30
Recipe Source: Baking
Dry Ingredients
1 ½ cups / 225 grams all purpose flour
1 tsp baking soda
2 cups / 300 grams poha
1 cup / 100 grams sunflower seeds
A pinch salt
Wet ingredients:
1 cup / 250 grams butter, soften
1 cup firmly packed light brown sugar
1 cup / 200 grams sugar
2 eggs
½ tsp vanilla extract

Sunflower Seed Poha Cookies
Method:
1. Preheat the oven to 350F / 180 C. Grease three large baking sheets or line with parchment paper.
2. Combine all dry ingredients together in a medium bowl and keep it aside.

3. Beat the butter, both the sugars and vanilla in a large bowl in a electric mixer on medium speed until creamy.

Sunflower Seed Poha Cookies
4. Add the eggs one at a time, beating until just blended after each addition.

Sunflower Seed Poha Cookies
5. With the mixer on low speed, beat in  all dry ingredients to combine everything together.
6. Drop tbsp of the dough 3 ~ 4 inches apart on to the prepared baking sheets.

Sunflower Seed Poha Cookies
Baking:
7. Bake for 10 ~ 15 minutes, until golden brown. Let the Cookie cool on the baking sheets until they harden a little, 2~3 minutes. Transfer to racks and let cool completely.
PRINT HERE
Sunflower Seed Poha Cookies
Preparation time: 20 minutes  

Baking time: 10 minutes
Yield : 20 ~ 30
Recipe Source: Baking

Dry Ingredients
1 ½ cups / 225 grams all purpose flour
1 tsp baking soda
2 cups / 300 grams poha
1 cup / 100 grams sunflower seeds
A pinch salt

Wet ingredients:
1 cup / 250 grams butter, soften
1 cup firmly packed light brown sugar
1 cup / 200 grams sugar
2 eggs
½ tsp vanilla extract

Method:
1. Preheat the oven to 350F / 180 C. Grease three large baking sheets or line with parchment paper.
2. Combine all dry ingredients together in a medium bowl and keep it aside.
3. Beat the butter, both the sugars and vanilla in a large bowl in a electric mixer on medium speed until creamy.
4. Add the eggs one at a time, beating until just blended after each addition.
5. With the mixer on low speed, beat in  all dry ingredients to combine everything together.
6. Drop tbsp of the dough 3 ~ 4 inches apart on to the prepared baking sheets.

Baking:
7. Bake for 10 ~ 15 minutes, until golden brown. Let the Cookie cool on the baking sheets until they harden a little, 2~3 minutes. Transfer to racks and let cool completely.

www.sarasyummyrecipes.com

Check out the Blogging Marathon page for the other Blogging Marathoners doing BM# 51

An InLinkz Link-up


April 3, 2015 Almond flour

Eggless Almond Cookies

Eggless Almond Cookies
                  This is super easy recipes which involves only two step.. Mix all ingredients together and roll and bake... easy Isn't?? You can use other nuts like pistachios, walnut, peanuts etc to your preference.  Sharing this recipe from mega Blogging Marathon # 51.
Preparation time: 15 minutes
Baking time: 15 ~ 18 minutes
Yield: 22 ~ 24 cookies
Adapted from here
Ingredients:
1 cup whole wheat flour / all purpose flour
½ cup granulated sugar
¼ tsp salt
¼ cup sliced almonds or any nuts of your choice
½ tsp cardamom powder or as needed
½ cup unsalted butter @ room temperature
1 ~ 2  tbsp of milk or as needed

Method
Preparation:
1. Line two 12 x 18 cookie sheet with parchment paper or silpat mat. Keep it aside till needed.
2. Preheat the oven to 350 F/180 C.  In a mixing bowl, mix wheat flour, sugar, salt, cardamom and almonds.
3. Add soften butter and mix the dry ingredients with a spatula to get crumbly mixture.  Drizzle little milk over the mixture and knead gently to make it as a soft dough.

Eggless Almond Cookies
4. Divide the cookie dough into 22 ~ 24 round balls and flatten them with your palms to shape the cookies. Arrange it on prepared tray with 1 inch apart.
Baking:


5. Bake the cookies in the preheated oven for 18 minutes.  Remove them from the oven and let them cool down for 2~ 3 minutes. Place them on a wire rack and allow them to cool.They will be soft when taken out, but will firm up once they cool. Store in an airtight container.
Eggless Almond Cookies
PRINT HERE
Eggless Almond Cookies
Preparation time: 15 minutes 

Baking time: 15 ~ 18 minutes
Yield: 22 ~ 24 cookies
Adapted from here
Ingredients:
1 cup whole wheat flour  / all purpose flour
½ cup granulated sugar
¼ tsp salt
¼ cup sliced almonds or any nuts of your choice
½ tsp cardamom powder or as needed
½ cup unsalted butter @ room temperature
1 ~ 2  tbsp of milk or as needed

Method
Preparation:
1. Line two 12 x 18 cookie sheet with parchment paper or silpat mat. Keep it aside till needed.
2. Preheat the oven to 350 F/180 C.  In a mixing bowl, mix wheat flour, sugar, salt, cardamom and almonds.
3. Add soften butter and mix the dry ingredients with a spatula to get crumbly mixture.  Drizzle little milk over the mixture and knead gently to make it as a soft dough.
4. Divide the cookie dough into 22 ~ 24 round balls and flatten them with your palms to shape the cookies. Arrange it on prepared tray with 1 inch apart.
Baking:

5. Bake the cookies in the preheated oven for 18 minutes.  Remove them from the oven and let them cool down for 2~ 3 minutes. Place them on a wire rack and allow them to cool.They will be soft when taken out, but will firm up once they cool. Store in an airtight container.

www.sarasyummyrecipes.com
Eggless Almond Cookies

Check out the Blogging Marathon page for the other Blogging Marathoners doing BM# 51

An InLinkz Link-up


April 2, 2015 Baked Recipes

Eggless Custard Cookies / Yo-Yo Cookies / Custard Sandwich Cookies

Eggless Custard Cookies / Yo-Yo Cookies / Custard Sandwich Cookies
 Yo yo Cookies are melt in mouth cookies are made out of custard powder with out eggs.. Custard powder is not actually custard which has been dried into a powder. It's mostly a starch that has been colored yellow, sweetened and flavored. Mostly the starch is from corn flour or tapioca or sago.       Custard Powder was invented by Alfred Bird in Birmingham, England in 1837 for his wife who couldn't eat eggs (click here to get more info). He began marketing it across the UK in 1844 which was very famous now and good substitute for Eggs.

This delicious cookies are mostly available in many bakeries with swirl shape topped with jam or cherry at the center.  You can enjoy this cookies as plain or with any filling  and it is also addressed as YO YO Cookies.  Sharing this recipe for Day 2 month long Blogging Marathon # 51.

Preparation time: 15 minutes
Baking time: 10 ~ 15 minutes
Yield:  16 ~ 32 cookies depends on size and shape
Adapted from  rainbowcooking
Ingredients:
175 grams / 12 tbsp butter @ room temperature
60 grams / ½ cup icing sugar
200 grams / 1 ¾ cup + 2 tbsp of all purpose flour
65 grams / ½ cup custard powder
½ tsp vanilla extract
A pinch of salt
Icing - (If needed)
2 tablespoons butter
1 tablespoon custard powder
⅓ cup icing sugar

Eggless Custard Cookies / Yo-Yo Cookies / Custard Sandwich Cookies
Method:
1. Sift flour and custard powder together and keep it aside.

2. Cream butter and icing sugar until light and fluffy. Add vanilla extract and mix again.


3. Add sifted flour and custard powder mixture to the creamed butter and continue to mix until it form a soft dough.
( First mixture will look crumbly, then it will form a soft dough.  So no need for any water or milk).

4. Transfer the dough to cookie press or icing bag or simply roll them in to equal size balls.
5. Arrange the cookies in closer distance ( cookies wont spread ) as shown in pictures and transfer it to preheated oven.

Baking:
6. Bake the cookies for 10 ~ 15 minutes ( if you are using cookie press, bake it for 10 minutes) or till it slightly change its color.
7. Transfer the cookies tray to cooling rack and cool to room temperature. Store it in air tight container or use icing to sandwich the cookies.
For Icing:
8. Melt the butter and mix the custard powder into the butter. Add icing sugar and mix to form a smooth paste.
9. Sort the biscuits into pairs that match in size and shape, and sandwich them together with butter icing or filling.

Eggless Custard Cookies / Yo-Yo Cookies / Custard Sandwich Cookies
PRINT HERE
Eggless Custard Cookies / Yo-Yo Cookies 
Preparation time: 15 minutes 

Baking time: 10 ~ 15 minutes
Yield:  16 ~ 32 cookies depends on size and shape
Adapted from  rainbowcooking
Ingredients:
175 grams / 12 tbsp butter @ room temperature
60 grams / ½ cup icing sugar
200 grams / 1 ¾ cup + 2 tbsp of all purpose flour
65 grams / ½ cup custard powder
½ tsp vanilla extract
A pinch of salt
Icing - (If needed)
2 tablespoons butter
1 tablespoon custard powder
⅓ cup icing sugar
Method:
1. Sift flour and custard powder together and keep it aside.
2. Cream butter and icing sugar until light and fluffy. Add vanilla extract and mix again.
3. Add sifted flour and custard powder mixture to the creamed butter and continue to mix until it form a soft dough. ( First mixture will look crumbly, then it will form a soft dough.  So no need for any water or milk).
4. Transfer the dough to cookie press or icing bag or simply roll them in to equal size balls.
5. Arrange the cookies in closer distance ( cookies wont spread ) as shown in pictures and transfer it to preheated oven.
Baking:
6. Bake the cookies for 10 ~ 15 minutes ( if you are using cookie press, bake it for 10 minutes) or till it slightly change its color.
7. Transfer the cookies tray to cooling rack and cool to room temperature. Store it in air tight container or use icing to sandwich the cookies.
For Icing:
8. Melt the butter and mix the custard powder into the butter. Add icing sugar and mix to form a smooth paste.
9. Sort the biscuits into pairs that match in size and shape, and sandwich them together with butter icing or filling.
www.sarasyummyrecipes.com
Eggless Custard Cookies / Yo-Yo Cookies / Custard Sandwich Cookies

Check out the Blogging Marathon page for the other Blogging Marathoners doing BM#
51

An InLinkz Link-up


April 1, 2015 Baked Recipes

Eggless Coconut Cookies / Super Crunchy Coconut Cookies

     This month Blogging Marathon is going to be a month long fun ride and we, BM team going to share the recipes straight from the oven,  under the theme "Fire up Your oven all this April".  You can expect more easy and foolproof recipes for this entire month at my blog.  To start with, I have selected cookies for this week.  And you can enjoy more savory and healthy baking recipes moving forward.
Now lets start our ride..            

Preparation time: 15 minutes
Baking time: 15 ~ 18 minutes
Yield: 22 ~ 24 cookies
Adapted from here

Ingredients:
1 cup wheat Flour
½ cup sugar
½ cup unsweetened desiccated coconut
½ cup unsalted Butter @ room temperature
⅛ tsp or a pinch of salt
½ tsp vanilla extract
1~ 2 tbsp Milk or as needed
1 ½ tbsp unsweetened Desiccated Coconut for topping
Method
Preparation:
1. Line two  12 x 18 cookie sheet with parchment paper or silpat mat. Keep it aside till needed.
2. Grind the sugar into a fine powder and set aside.

3. Preheat the oven to 350 F/180 C. While oven is preheating, Cream butter and powdered sugar in a mixing bowl using a hand mixer or stand mixer til it become light and creamy.

4. Add the vanilla and salt and combine. Then add the wheat flour and coconut to it. Mix the mixture.
5. Sprinkle milk over the mixture and mix to get a smooth dough. ( When you feel dough is crumbly, mix the mixture with your fingers to check for correct consistency, If needed add more liquid to make it soft.

6. Divide the cookie dough into 22 ~ 24 round balls and flatten them with your palms to shape the cookies. Arrange it on prepared tray with 1 inch apart. Top it with coconut.
Baking:
7. Bake the cookies in the preheated oven for 18 minutes.  Remove them from the oven and let them cool down for 2~ 3 minutes. Place them on a wire rack and allow them to cool.They will be soft when taken out, but will firm up once they cool. Store in an airtight container.

PRINT HERE
Eggless Wholewheat Coconut Cookies / Best Coconut Cookies 
Preparation time: 15 minutes 

Baking time: 15 ~ 18 minutes
Yield: 22 ~ 24 cookies

Ingredients:
1 cup wheat Flour
½ cup sugar
½ cup unsweetened desiccated coconut
½ cup unsalted Butter@ room temperature
⅛ tsp or a pinch of salt
½ tsp vanilla extract
1~ 2 tbsp Milk or as needed
1 ½ tbsp unsweetened Desiccated Coconut for topping
Method
Preparation:
1. Line two 12 x 18 cookie sheet with parchment paper or silpat mat. Keep it aside till needed.
2. Grind the sugar into a fine powder and set aside.
3. Preheat the oven to 350 F/180 C. While oven is preheating, Cream butter and powdered sugar in a mixing bowl using a hand mixer or stand mixer til it become light and creamy.
4. Add the vanilla and salt and combine. Then add the wheat flour and coconut to it. Mix the mixture.
5. Sprinkle milk over the mixture and mix to get a smooth dough. ( When you feel dough is crumbly, mix the mixture with your fingers to check for correct consistency, If needed add more liquid to make it soft.
6. Divide the cookie dough into 22 ~ 24 round balls and flatten them with your palms to shape the cookies. Arrange it on prepared tray with 1 inch apart. Top it with coconut.
Baking:
7. Bake the cookies in the preheated oven for 18 minutes.  Remove them from the oven and let them cool down for 2~ 3 minutes. Place them on a wire rack and allow them to cool.They will be soft when taken out, but will firm up once they cool. Store in an airtight container.
www.sarasyummyrecipes.com
Linking this recipe to Mega Blogging Marathon # 51 under fire up your oven all this April!. Do check the below list for what other marathoners are doing this April!!

Check out the Blogging Marathon page for the other Blogging Marathoners doing BM# 51

An InLinkz Link-up


March 24, 2015 Lunch Recipes

Shrimp Drumstick Gravy / Eral Murungakkai Kuzhambu / Royyalu Mulakkada Pulusu

Shrimp Drumstick Gravy / Eral Murungakkai Kuzhambu / Royyalu Mulakkada Pulusu
Preparation time: 20 ~ 30 minutes
Cooking time: 25 ~ 35 minutes
Serves: 2 ~ 3
Sources: sarasyummybites
Ingredients:
100 grams / 17 ~ 20 no of medium size shrimp ( frozen or fresh)
50 grams / 1 onion, chopped or equivalent pearl onion (sambhar onion)
50 grams / 1 tomato, chopped
1 medium size drumstick
2 tsp of red chili powder & coriander powder 
(OR)  1 tbsp curry powder / Kuzhambu milagai thool
¼ tsp turmeric powder
Gooseberry size tamarind 
Salt to taste
water as needed
For Seasoning:
2 tbsp cooking oil ( Sesame oil is best)
½ tsp mustard seeds
½ tsp fennel seeds
¼ tsp fenugreek seeds 
1 string of curry leaves
7 ~ 10 garlic pods, peeled and crushed
1 red chili ( optional)
Method:
Preparation:
1.  Rinse the shrimp with cold water.  Then peel the shrimp, by gently pulling the shell from head, tail and middle part of the shrimp.  Devein / remove the black thread ( intestine) which runs at the back of the shrimp with help of sharp knife.  Rinse again twice or thrice and keep it aside.
Image source: Google image
2. Wash the veggies. Peel and chop as needed. Crush garlic and keep it aside.
3. While cleaning the shrimp, soak the tamarind in ½ cup of warm water (This make the tamarind soft and easy to extract).  After the tamarind become soft, extract the juice from it and strain it through strainer. Add extra water as needed to get 1 ~ 1 ½ cup of tamarind juice.
Shrimp Drumstick Gravy / Eral Murungakkai Kuzhambu / Royyalu Mulakkada Pulusu
Cooking:
4. Heat oil in kadai / pan, add seasoning ingredients one by one to allow them to splutter.  
5. When garlic slightly burns, throw in chopped onions and saute till it become soft and transparent.

 6. Then add drumstick , cook for few minutes and then add chopped tomato and saute till it become soft and mushy. 


7. Add curry powder, tamarind powder and salt. Mix and cook it in medium heat till raw smell disappear. Stir continuously to avoid sticking to the bottom.
8. When oil starts to separates, add cleaned shrimp and mix to coat the masala on the shrimp.

9.  After 30 seconds, add extracted tamarind juice. Mix to mixture and allow it to boil. Adjust salt and spice to taste.  Boil till gravy thickens. Serve hot with rice or idly and dosa.
Shrimp Drumstick Gravy / Eral Murungakkai Kuzhambu / Royyalu Mulakkada Pulusu

PRINT HERE
Shrimp Drumstick Gravy / Eral Murungakkai Kuzhambu 
Preparation time: 20 ~ 30 minutes

Cooking time: 25 ~ 35 minutes
Serves: 2 ~ 3
Sources: sarasyummybites

Ingredients:
100 grams / 17 ~ 20 no of medium size shrimp ( frozen or fresh)
50 grams / 1 onion, chopped or equivalent pearl onion (sambhar onion)
50 grams / 1 tomato, chopped
1 medium size drumstick
2 tsp of red chili powder & coriander powder
(OR)  1 tbsp curry powder / Kuzhambu milagai thool
¼ tsp turmeric powder
Gooseberry size tamarind
Salt to taste
water as needed

For Seasoning:
2 tbsp cooking oil ( Sesame oil is best)
½ tsp mustard seeds
½ tsp fennel seeds
¼ tsp fenugreek seeds
1 string of curry leaves
7 ~ 10 garlic pods, peeled and crushed
1 red chili ( optional)

Method:
Preparation:
1.  Rinse the shrimp with cold water.  Then peel the shrimp, by gently pulling the shell from head, tail and middle part of the shrimp.  Devein / remove the black thread ( intestine) which runs at the back of the shrimp with help of sharp knife.  Rinse again twice or thrice and keep it aside.
2. Wash the veggies. Peel and chop as needed. Crush garlic and keep it aside.
3. While cleaning the shrimp, soak the tamarind in ½ cup of warm water (This make the tamarind soft and easy to extract).  After the tamarind become soft, extract the juice from it and strain it through strainer. Add extra water as needed to get 1 ~ 1 ½ cup of tamarind juice.

Cooking:
4. Heat oil in kadai / pan, add seasoning ingredients one by one to allow them to splutter.  5. When garlic slightly burns, throw in chopped onions and saute till it become soft and transparent.

6 Then add drumstick , cook for few minutes and then add chopped tomato and saute till it become soft and mushy.
7. Add curry powder, tamarind powder and salt. Mix and cook it in medium heat till raw smell disappear. Stir continuously to avoid sticking to the bottom.
8. When oil starts to separates, add cleaned shrimp and mix to coat the masala on the shrimp.
9. After 30 seconds, add extracted tamarind juice. Mix the mixture and allow it to boil. Adjust salt and spice to taste.  Boil till gravy thickens. Serve hot with rice or idly and dosa.

March 16, 2015 Chutneys/ Thovaiyal/ Dipping

Peerkangai Thol Thogayal Version 2 / Ridge Ground Thogayal 2

 Most of the Veggies and Fruit peel which are discarded, holds more nutrients then compare to its flesh and also found safe for consumption. The ridge gourd fruit which is cooked as vegetable has more health benefits. The peel and pulp are used in South Indian kitchen in making varius recipes.  Since it is rich in fibers, vitamins and minerals and also low in calories and fats,  makes them an integral part of a healthy diet.

The recipe which I shared below is one of the thogayal method we used to make at home. You can check here for same thogayal with different ingredeints which I have shared before. Try this easy recipes and share your thoughts.

Preparation time: less than 20 minutes
Cooking time: 10 ~ 15 minutes
Yield: approx 100 gms of thogayal
Sources: sarasyummybites
Ingredients:
½ cup Peerkangai thol / Ridge ground peel ( skin from one big ridge ground)
½ cup roasted peanuts
2 ~ 3 red chili, broken into two or to taste
1 green chili,  broken into two or to taste
1 inch ginger, peeled and chopped
¼ tsp hing/ Asafoetida 
¼ cup cubed coconut pieces
A small gooseberry size tamarind
Salt to taste
2 ~ 3 tbsp water or as needed
1 tsp oil
Method:
Preparation:
1. Wash and peel ridge ground, ginger. Wash coconut and cube it in to desired shape and do the same with ginger. Keep it aside till use.
Cooking:
2. Heat oil in skillet, when oil gets hot, throw in green chili and red chili along with hing and ginger. 
3. Saute for few  minutes and add the peel and give a stir. Cook till it become soft. this may take 4 ~ 5 minutes. 
4. Lower the heat and add peanuts, coconut pieces. Saute for few seconds and turns off the heat and cool the mixture for few minutes.
5. Transfer the mixture along with tamarind. Add salt and 3 tbsp of water. Grind the mixture into fine paste. Adjust salt to taste and add water as needed. Serve as a side dish for rice and idli, dosa variety..
PRINT HERE
Peerkangai Thol Thogayal -2 
Preparation time: less than 20 minutes

Cooking time: 10 ~ 15 minutes
Yield: approx 100 gms of thogayal
Sources: sarasyummybites

Ingredients:
½ cup Peerkangai thol / Ridge ground peel ( skin from one big ridge ground)
½ cup roasted peanuts
2 ~ 3 red chili, broken into two or to taste
1 green chili,  broken into two or to taste
1 inch ginger, peeled and chopped
¼ tsp hing/ Asafoetida
¼ cup cubed coconut pieces
A small gooseberry size tamarind
Salt to taste
2 ~ 3 tbsp water or as needed
1 tsp oil
Method:
Preparation:
1. Wash and peel ridge ground, ginger. Wash coconut and cube it in to desired shape and do the same with ginger. Keep it aside till use.
Cooking:
2. Heat oil in skillet, when oil gets hot, throw in green chili and red chili along with hing and ginger.
3. Saute for few  minutes and add the peel and give a stir. Cook till it become soft. this may take 4 ~ 5 minutes.
4. Lower the heat and add peanuts, coconut pieces. Saute for few seconds and turns off the heat and cool the mixture for few minutes.
5. Transfer the mixture along with tamarind. Add salt and 3 tbsp of water. Grind the mixture into fine paste. Adjust salt to taste and add water as needed. Serve as a side dish for rice and idli, dosa variety..

                              www.sarasyummyrecipes.com

March 11, 2015 Baked Recipes

Eggless Carrot & Herb Muffins

Eggless Carrot & Herb Muffins

                  Muffins are healthier treat which are fully loaded with nutrients and vitamins with low calories and can be made easily and quickly.  We can make these muffins with vegetable, fruits, seeds, raisins, whole grains, spices, honey and no of other detectable ingredients.  Makes a perfect lunchbox recipes for kids.  When Priya Suresh challenged us savory bakes for Home Bakers Challenge, I don't want to miss it. I really like to bake savory goodies. First I baked spinach feta muffin and end up without no muffins for pictures ( but will sure blog about it soon). Again baked these carrot herb muffins which are equally good as spinach feta muffins and saved three for photo shoot, before showing them to my boys 🙂 🙂  The crust formed by cheese and nuts topping gave these muffin cruncher texture outside  and carrots paneer made it soft inside. I actually added  ½ tsp of red chili powder to my family taste and you can add or avoid spice like peppercorns or crushed green chilies or red chili powder to your preferences.  Let see the recipe in detail..

Preparation time: 25 ~ 30 minutes
Baking time: 20 ~ 25 minutes
Yield: 6 nos
Adapted from here


Dry Ingredients:
¼ cup all purpose flour
¼ cup whole wheat flour
½ tsp baking powder
⅛ tsp or a pinch of baking soda
½ tsp salt
Wet Ingredients:
1 medium carrot, coarsely grated
½ tsp mixed herbs 
3 tbsp grated paneer
1 tbsp vegetable oil
½ cup ground tofu OR ( whisked yogurt + 1 tsp vinegar )
3~4 tbsp water  +  3~4 tbsp for grinding tofu
Topping Ingredients:
Grated cheese, I used Parmesan 
Few pieces of chopped walnuts or almonds

Method:
Preparation:
1. Preheat the oven to 180°C / 350°F . Grease cupcake tray or molds with butter or oil spray ( This is very important even for paper liners, other wise batter will stick and will not come out as normal muffins).  Keep it aside. 
2. In a bowl, mix all the dry ingredients with a whisk. Keep aside.

Dry Ingredients & ground tofu
3. In another bowl, mix the grated carrot, paneer, herbs, red chili powder. ground tofu OR (Yogurt vinegar mixture) vegetable oil, until they are combined together.

4.  Mix  dry ingredients and  wet ingredients together.  (Do not over mix, it is fine with any small lumps and if you think the mix is too dry, add water 1 tbsp at a time, until it is thick like idli batter consistency). 
5. Divide the batter into 6 cupcake molds with ¾th of muffin pan and top with a little grated cheese and walnut bits.

Baking: 
6. Transfer the cake tin to baking oven and bake it at 350°F for 20-25 minutes or till done.
7. Once muffins are done, transfer it to cooling tray and allow it to cool for 2 ~ 3 minutes and serve warm.
PRINT HERE
Eggless Carrot & Herb Muffins 
Preparation time: 25 ~ 30 minutes

Eggless Carrot & Herb Muffins
Baking time: 20 ~ 25 minutes
Yield: 6 nos
Adapted from here
Dry Ingredients:
¼ cup all purpose flour
¼ cup whole wheat flour
½ tsp baking powder
⅛ tsp or a pinch of baking soda
½ tsp salt
Wet Ingredients:
1 medium carrot, coarsely grated
½ tsp mixed herbs 
3 tbsp grated paneer
1 tbsp vegetable oil
½ cup ground tofu OR ( whisked yogurt + 1 tsp vinegar )
3~4 tbsp water  +  3~4 tbsp for grinding tofu
½ tsp red chili powder (optional)
Topping Ingredients:
Grated cheese ,  I used Parmesan 
Few pieces of chopped walnuts or almonds
Method:
Preparation:
1. Preheat the oven to 180°C / 350°F . Grease cupcake tray or molds with butter or oil spray ( This is very important even for paper liners, other wise batter will stick and will not come out as normal muffins).  Keep it aside. 
2. In a bowl, mix all the dry ingredients with a whisk. Keep aside.
3. In another bowl, mix the grated carrot, paneer, herbs, red chili powder, ground tofu OR (Yogurt vinegar mixture) vegetable oil, until they are combined together.
4.  Mix  dry ingredients and  wet ingredients together.  (Do not over mix, it is fine with any small lumps and if you think the mix is too dry, add water 1 tbsp at a time, until it is thick like idli batter consistency). 
5. Divide the batter into 6 cupcake molds with ¾th of muffin pan and top with a little grated cheese and walnut bits.
Baking: 
6. Transfer the cake tin to baking oven and bake it at 350°F for 20-25 minutes or till done.
7. Once muffins are done, transfer it to cooling tray and allow it to cool for 2 ~ 3 minutes and serve warm.
                                  www.sarasyummyrecipes.com
    Eggless Carrot & Herb Muffins


    Mushroom Briyani

    March 9, 2015 Briyani

    Mushroom Briyani / மஷ்ரூம் பிரியாணி

    Preparation time: 10 ~ 15 minutes
    Cooking time: more or less 30 minutes
    Serves: 4
    Source : sarasyummybites
    Ingredients:
    1 ½ cups / 300 ~ 350 grams basmati rice
    10 medium size mushroom, sliced 
    1 / 100 grams onion, sliced thinly
    1 / less or equal to 100 grams, sliced lengthwise
    3 medium size green chili
    1 tsp ginger garlic paste
    1 ~ 1 ½ tsp red chili powder
    ¼ tsp turmeric powder
    1 tbsp curd
    Handful of mint and cilantro, chopped
    Salt to taste
    For Seasoning:
    2 tbsp oil + 1 tbsp ghee
    2 cardamon 
    2 cloves
    1 small piece cinnamon
    1 bay leaves
    ½ tsp fennel seeds
    Mushroom Briyani
    Methods:
    Preparation:
    1. Wash and soak rice for 20 ~ 30 minutes. And strain the water from rice and keep it aside till use.
    2. Wash, peel and chop veggies as needed or as per instruction in ingredients list. 
    Cooking:
    3. In a pressure pan or a wide heavy bottom pan, heat oil ghee mixture. Throw in seasoning ingredients one by one and allow them to splutter.
    4. Add thinly sliced onions and saute till it become soft and transparent with golden brown color.
    5. Add ginger garlic paste and green chilies and saute till raw smell disappear from ginger and garlic. Meantime stir continuously to avoid mixture sticks to the bottom of the pan.
    6. Then add turmeric powder, red chili powder, curd and salt. Mix and stir till oil separates from the mixture. Now add tomato slices. Mix and cover the mixture with lid for 1 or 2 minutes.
    7. At this stage,  tomato pieces will be soft but still retain its shape. Throw in sliced mushroom, mint and cilantro leaves and mix to cooperate with the mixture. Cover and cook it for few minutes for 2 ~ 3 minutes.
    8. Add 3 cups of water with soaked and strained rice. Adjust salt and spice to taste.  Allow rice and mushroom mixture to boil vigorously.
    9. Now lower the heat to minimum setting and cover the pan with lid and place a weight ( if you are using a pressure pan or place a bowlful of  hot water on top of the plate which covers the rice mushroom pan)  and cook it for 10 minutes not more than that.
    10. Turn of the heat, allow it to cool little bit.  After 5 or 10 minutes, open the lid and gently mix the rice.  Serves with any kind of raitha.
    PRINT HERE
    Mushroom Briyani  / மஷ்ரூம் பிரியாணி 

    Preparation time: 10 ~ 15 minutes

    Cooking time: more or less 30 minutes
    Serves: 4
    Source : sarasyummybites

    Ingredients:
    1 ½ cups / 300 ~ 350 grams basmati rice
    10 medium size mushroom, sliced
    1 / 100 grams onion, sliced thinly
    1 / less or equal to 100 grams, sliced lengthwise
    3 medium size green chili
    1 tsp ginger garlic paste
    1 ~ 1 ½ tsp red chili powder
    ¼ tsp turmeric powder
    1 tbsp curd
    Handful of mint and cilantro, chopped
    Salt to taste

    For Seasoning:
    2 tbsp oil + 1 tbsp ghee
    2 cardamon
    2 cloves
    1 small piece cinnamon
    1 bay leaves
    ½ tsp fennel seeds

    Methods:
    Preparation:
    1. Wash and soak rice for 20 ~ 30 minutes. And strain the water from rice and keep it aside till use.
    2. Wash, peel and chop veggies as needed or as per instruction in ingredients list.

    Cooking:
    3. In a pressure pan or a wide heavy bottom pan, heat oil ghee mixture. Throw in seasoning ingredients one by one and allow them to splutter.
    4. Add thinly sliced onions and saute till it become soft and transparent with golden brown color.
    5. Add ginger garlic paste and green chilies and saute till raw smell disappear from ginger and garlic. Meantime stir continuously to avoid mixture sticks to the bottom of the pan.
    6. Then add turmeric powder, red chili powder, curd and salt. Mix and stir till oil separates from the mixture. Now add tomato slices. Mix and cover the mixture with lid for 1 or 2 minutes.
    7. At this stage,  tomato pieces will be soft but still retain its shape. Throw in sliced mushroom, mint and cilantro leaves and mix to cooperate with the mixture. Cover and cook it for few minutes for 2 ~ 3 minutes.
    8. Add 3 cups of water with soaked and strained rice. Adjust salt and spice to taste.  Allow rice and mushroom mixture to boil vigorously.
    9. Now lower the heat to minimum setting and cover the pan with lid and place a weight ( if you are using a pressure pan or place a bowlful of  hot water on top of the plate which covers the rice mushroom pan)  and cook it for 10 minutes not more than that.
    10. Turn of the heat, allow it to cool little bit.  After 5 or 10 minutes, open the lid and gently mix the rice.  Serves with any kind of raitha.

                                    www.sarasyummyrecipes.com
      Mushroom Briyani


      Egg Omlet Briyani

      March 4, 2015 Briyani

      Egg Omelet Briyani / Egg Briyani version 2 / Omelet Briyani

      Omelet Briyani
      Preparation time: 15 minutes
      Cooking time: less than 30 minutes
      Serves: 3 ~ 4
      Source : Here
      Ingredients:
      3 eggs
      1 ~ ½ cup rice
      100 grams / 1 big onion, sliced thinly
      100 grams / 1 big tomato, chopped
      ¼ tsp turmeric powder
      1 tbsp curd 
      Handful of mint leaves and cilantro, together
      Salt to taste
      Few drops of orange food color or kesari color

      For Grinding:
      3 tbsp coconut pieces, chopped
      3 red chilies
      Small piece of ginger, peeled and chopped
      2 ~ 3 garlic pods. peeled
      ½ tsp fennel seeds
      6 ~7 cashews
      For Seasoning:
      2 tbsp oil + 1 tbsp ghee
      1 ~ 2 cardamom
      1 ~ 2 cloves
      1 small piece of cinnamon
      1 bay leaves
      ½ tsp fennel seeds
      Method:
      Preparation:
      1. Wash and soak rice for 20 minutes. Peel and chop the required veggies and set aside.
      2. Grind all grinding in to semi fine paste and keep it ready.

      Cooking:
      3. Beat the eggs in a bowl with pinch of turmeric powder and required salt.
      4. Heat small skillet and apply little oil. Pour the egg mixture and low the heat. Cover and cook till done. it may take 5 ~ 7 minutes depends on your heat level..( do not flip the omelet other side).

      Omelet Briyani
      Omelet Briyani
      5. Remove the egg omelet and cut it in to cubes ( you can cube as paneer chunks ) and set aside till needed.
      6. Heat oil and ghee in a wide pan, when oil mixture gets hot, add all seasoning ingredients one by one and allow it to splutter.

      Omelet Briyani
      7. Throw in sliced onions, fry till it caramelize ( golden brown color) then add ground paste and fry till raw smell disappear. Now add curd and mix. ( Paste will stick to the bottom of the pan, so stir continuously).
      8. Now add turmeric powder, tomatoes, mint and cilantro. Mix and cook it in low heat, Finally add omelet pieces and mix again. Cook it in low heat.

      Omelet Briyani


      9. Meantime, Heat 3 cups of water in a sauce pan and bring to boil. Add soaked rice with salt and cook it for 80 % say for 5 ~ 7 minutes ( this may vary depends on rice age. New rice will cook sooner and old rice will take time).

      10. Drain the rice through strainer and transfer it to omelet mixture. Spread evenly over the omelet mixture and add orange food coloring. Cover with thigh lid and cook it for 10 minutes in low heat.

      Omelet Briyani


      11. After 10 minutes, turn off the heat and wait for 5 ~ 10 minutes. Open the lid and gently mix the rice till masala coats evenly.   Serve hot with spicy side dish..

      PRINT HERE
      Egg Omelet Briyani / Egg Briyani version 2 / Omelet Briyani
      Preparation time: 15 minutes  

      Cooking time: less than 30 minutes
      Serves: 3 ~ 4
      Source : Here

      Ingredients:
      3 eggs
      1 ~ ½ cup rice
      100 grams / 1 big onion, sliced thinly
      100 grams / 1 big tomato, chopped
      ¼ tsp turmeric powder
      1 tbsp curd
      Handful of mint leaves and cilantro, together
      Salt to taste
      Few drops of orange food color or kesari color


      For Grinding:
      3 tbsp coconut pieces, chopped
      3 red chilies
      Small piece of ginger, peeled and chopped
      2 ~ 3 garlic pods. peeled
      ½ tsp fennel seeds
      6 ~7 cashews

      For Seasoning:
      2 tbsp oil + 1 tbsp ghee
      1 ~ 2 cardamom
      1 ~ 2 cloves
      1 small piece of cinnamon
      1 bay leaves
      ½ tsp fennel seeds

      Method:
      Preparation:
      1. Wash and soak rice for 20 minutes. Peel and chop the required veggies and set aside.
      2. Grind all grinding in to semi fine paste and keep it ready.

      Cooking:
      3. Beat the eggs in a bowl with pinch of turmeric powder and required salt.
      4. Heat small skillet and apply little oil. Pour the egg mixture and low the heat. Cover and cook till done. it may take 5 ~ 7 minutes depends on your heat level..( do not flip the omelet other side).
      5. Remove the egg omelet and cut it in to cubes ( you can cube as paneer chunks ) and set aside till needed.
      6. Heat oil and ghee in a wide pan, when oil mixture gets hot, add all seasoning ingredients one by one and allow it to splutter.
      7. Throw in sliced onions, fry till it caramelize ( golden brown color) then add ground paste and fry till raw smell disappear. Now add curd and mix.( Paste will stick to the bottom of the pan, so stir continuously).
      8. Now add turmeric powder, tomatoes, mint and cilantro. Mix and cook it in low heat, Finally add omelet pieces and mix again. Cook it in low heat.
      9. Meantime, Heat 3 cups of water in a sauce pan and bring to boil. Add soaked rice with salt and cook it for 80 % say for 5 ~ 7 minutes ( this may vary depends on rice age. New rice will cook sooner and old rice will take time).
      10. Drain the rice through strainer and transfer it to omelet mixture. Spread evenly over the omelet mixture and add orange food coloring. Cover with thigh lid and cook it for 10 minutes in low heat.
      11. After 10 minutes, turn off the heat and wait for 5 ~ 10 minutes. Open the lid and gently mix the rice till masala coats evenly.   Serve hot with spicy side dish..

                                      www.sarasyummyrecipes.com
        Omelet Briyani


        March 3, 2015 Briyani

        Chettinad Shrimp Briyani / Chettinad Eral Briyani

        Chettinad Prawn Briyani / செட்டிநாடு இறால் பிரியாணி
                               Simple and delicious briyani recipe from Chettinad cuisine which are hot and pungent with fresh ground masalas.  I have adapted this recipe from below link and used Shrimp instead of Chicken. You can use mutton or vegetables in place of chicken or shrimp which will also tastes good equally with different flavors.  Try this Briyani and delight your Sunday.
          
        Preparation time: 30 minutes
        Soaking time including marinating time: 30 minutes
        Cooking time 30 ~ 40 minutes
        Yield: 4 ~ 5
        Adapted from Solai achi's Chicken briyani
        Ingredients:
        For Seasoning:
        3 tbsp oil + 1 tbsp ghee
        1 inch cinnamon
        2 clove
        2 cardamom
        1 bay leave
        ½ tsp fennel seeds
        For Grinding:
        2 inch ginger pieces as shown in picture
        4~5 garlic pods
        3 ~ 4 red chili or to taste 
        3 ~ 4 green chili or to taste
        1 tsp fennel seeds
        Small piece of cinnamon & 2 cloves ( I avoided due to my family preference)
        Handful of mint and cilantro
        For Marinating:
        1 tbsp curd
        ½ tsp red chili powder
        1 tsp coriander powder
        1 tsp turmeric powder
        ½ quantity of grinded masala
        Main Ingredients:
        1 lb / 500 grams Prawn
        2 cups / 450 grams basmathi rice
        2 / 200 grams onions, chopped finely
        2 / 200 grams tomato, chopped finely
        1 cup coconut milk, freshly squeezed or storebought one
        Salt to taste
        1 ~ 2 tbsp ghee
        Chettinad Prawn Briyani / செட்டிநாடு இறால் பிரியாணி
        Method:
        Preparation :
        1. Grind the grinding ingredients in to fine paste and keep it aside.

        Chettinad Prawn Briyani / செட்டிநாடு இறால் பிரியாணி
        2. Grind coconut pieces with required amount of water and squeeze fresh milk from it and keep it aside. ( If you end up with more milk than reduce the water amount for cooking or use remaining coconut milk in other dishes).

        Chettinad Prawn Briyani / செட்டிநாடு இறால் பிரியாணி

        3. Marinate prawns with marinating ingredients in a mixing bowl. Cover and rest in refrigerator for 2 hours or for minimum 30 minutes. Meantime wash and soak rice with sufficient water for 30 minutes.

        Chettinad Prawn Briyani / செட்டிநாடு இறால் பிரியாணி
        Chettinad Prawn Briyani / செட்டிநாடு இறால் பிரியாணி

        4. Wash onion and tomatoes. Peel onion and chop finely and do the same with tomatoes. Keep it aside till use.

        Cooking: 
        5. In a wide heavy bottom pan, heat oil and ghee. once oil mixture get hot add seasoning ingredients one by one and allow it to splutter.

        Chettinad Prawn Briyani / செட்டிநாடு இறால் பிரியாணி

        6. Throw in finely chopped onions, saute and cook till it become brownies and transparent. Then add chopped tomatoes. Mix and cook for 5 ~ 7 minutes. Cover the pan while tomatoes are cooking. Saute in between.

        Chettinad Prawn Briyani / செட்டிநாடு இறால் பிரியாணி
        7. Once tomatoes become soft and lose it texture and shape, add remaining ground paste and cook till raw smell disappear. 
        8. Now add marinated prawns and stir once for a minute. (No need to cook the prawns long) Add coconut milk and water ( I got 1 ½ cups of coconut milk, So I added 2 ½ cup of water to the prawn mixture of 1: 2  rice water ratio ).

        Chettinad Prawn Briyani / செட்டிநாடு இறால் பிரியாணி

        9. Adjust salt and spice to taste. When mixture starts to boil vigorously, add soaked, drained rice. Mix and continue to cook in medium heat.

        10. When rice mixture boils, reduce the heat to low heat and cover the pan with tight lid or cover with foil paper and place the lid over the pan with heavy object like bowlful of hot water. And continue to cook for 10 minutes.

        Chettinad Prawn Briyani / செட்டிநாடு இறால் பிரியாணி


        11. After 10 minutes, turn off the heat and allow it to cool for 5 ~ 10 minutes, before opening the pan. Gently mix the rice and serve hot with raitha and eggs.

        Chettinad Prawn Briyani / செட்டிநாடு இறால் பிரியாணி
        PRINT HERE
          Chettinad Prawn Briyani  / செட்டிநாடு இறால் பிரியாணி

        Preparation time: 30 minutes

        Soaking time including marinating time: 30 minutes
        Cooking time 30 ~ 40 minutes
        Yield: 4 ~ 5
        Adapted from Solai achi's Chicken briyani

        Ingredients:
        For Seasoning:
        3 tbsp oil + 1 tbsp ghee
        1 inch cinnamon
        2 clove
        2 cardamom
        1 bay leave
        ½ tsp fennel seeds

        For Grinding:
        2 inch ginger pieces as shown in picture
        4~5 garlic pods
        3 ~ 4 red chili or taste
        3 ~ 4 green chili or to taste
        1 tsp fennel seeds
        Small piece of cinnamon & 2 cloves ( I avoided due to my family preference)
        Handful of mint and cilantro

        For Marinating:
        1 tbsp curd
        ½ tsp red chili powder
        1 tsp coriander powder
        1 tsp turmeric powder
        ½ quantity of grinded masala

        Main Ingredients:
        1 lb / 500 grams Prawn
        2 cups / 450 grams basmathi rice
        2 / 200 grams onions, chopped finely
        2 / 200 grams tomato, chopped finely
        1 cup coconut milk, freshly squeezed or storebought one
        Salt to taste
        1 ~ 2 tbsp ghee

        Method:
        Preparation :
        1. Grind the grinding ingredients in to fine paste and keep it aside.
        2. Grind coconut pieces with required amount of water and squeeze fresh milk from it and keep it aside. ( If you end up with more milk than reduce the water amount for cooking or use remaining coconut milk in other dishes).
        3. Marinate prawns with marinating ingredients in a mixing bowl. Cover and rest in refrigerator for 30 minutes. Meantime wash and soak rice with sufficient water for 2 hours or for minimum minutes.
        4. Wash onion and tomatoes. Peel onion and chop finely and do the same with tomatoes. Keep it aside till use.

        Cooking: 

        5. In a wide heavy bottom pan, heat oil and ghee. once oil mixture get hot add seasoning ingredients one by one and allow it to splutter.
        6. Throw in finely chopped onions, saute and cook till it become brownies and transparent. Then add chopped tomatoes. Mix and cook for 5 ~ 7 minutes. Cover the pan while tomatoes are cooking. Saute in between.
        7. Once tomatoes become soft and lose it texture and shape, add remaining ground paste and cook till raw smell disappear.
        8. Now add marinated prawns and stir once for a minute. (No need to cook the prawns long) Add coconut milk and water ( I got 1 ½ cups of coconut milk, So I added 2 ½ cup of water to the prawn mixture of 1: 2  rice water ratio ) .
        9. Adjust salt and spice to taste. When mixture starts to boil vigorously, add soaked, drained rice. Mix and continue to cook in medium heat.
        10. When rice mixture boils, reduce the heat to low heat and cover the pan with tight lid or cover with foil paper and place the lid over the pan with heavy object like bowlful of hot water. And continue to cook for 10 minutes.
        11. After 10 minutes, turn off the heat and allow it to cool for 5 ~ 10 minutes, before opening the pan. Gently mix the rice and serve hot with raitha and eggs.

                                        www.sarasyummyrecipes.com

          Linking to Savitha and Geetha Aachal's Friendship 5 series ~ Briyani series


          • « Go to Previous Page
          • Page 1
          • Page 2
          • Page 3
          • Page 4
          • Page 5
          • Interim pages omitted …
          • Page 22
          • Go to Next Page »

          Primary Sidebar

          Recipe Categories

          Recent Posts

          • Paal Pongal
          • Karnataka Special Ellu Bella / Sesame jaggery
          • Ellu Burfi/ Sesame Chikki/ Till Chikki
          • Andhra Idli Karam / Idli Podi
          • Tomato Pappu/ Tomatillo Pappu/ Thakkali paruppu kadaiyal/ Green tomato dal

          Footer

          South Indian Recipes

          Pongal Recipes, Traditional paal pongal, Mattu Pongal, Simple rice
          Vanjaram Varuval
          Lemon Tomato Rasam
          Cauliflower Egg Fry Poriyal
          Kovil Puliyodarai

          Shrimp Kuzhambhu
          Mushroom Briyani
          Egg Omlet Briyani
          Chettinadu Shrimp/ Eral Briyani
          Mutton Briyani

          Shrimp Dum Briyani

          Footer

          ↑ back to top

          About

          • Privacy Policy
          • Disclaimer
          • Terms & Conditions
          • Accessibility Policy

          Newsletter

          • Sign Up! for emails and updates

          Contact

          • Contact
          • Services
          • Media Kit
          • FAQ

          As an Amazon Associate I earn from qualifying purchases.

          Copyright © 2020 Brunch Pro on the Brunch Pro Theme